Description
A tutorial and how-to demonstration of a download and installation of Git on Windows 10 64 bit. All install options are discussed in some detail in a step-by step fashion. The Bash shell, MinTTY, and MinGW 64 bit are briefly discussed & the configuration / install options are considered. This particular Git version is 2.23.0.
Blog Post, Transcript + Links
Welcome to the Grok Shop! In this video I’ll be going over the download, installation and basic configuration of Git in Windows 10. So, in order to get Git, we want to go to:
Next, we’re going to click on “Windows”:
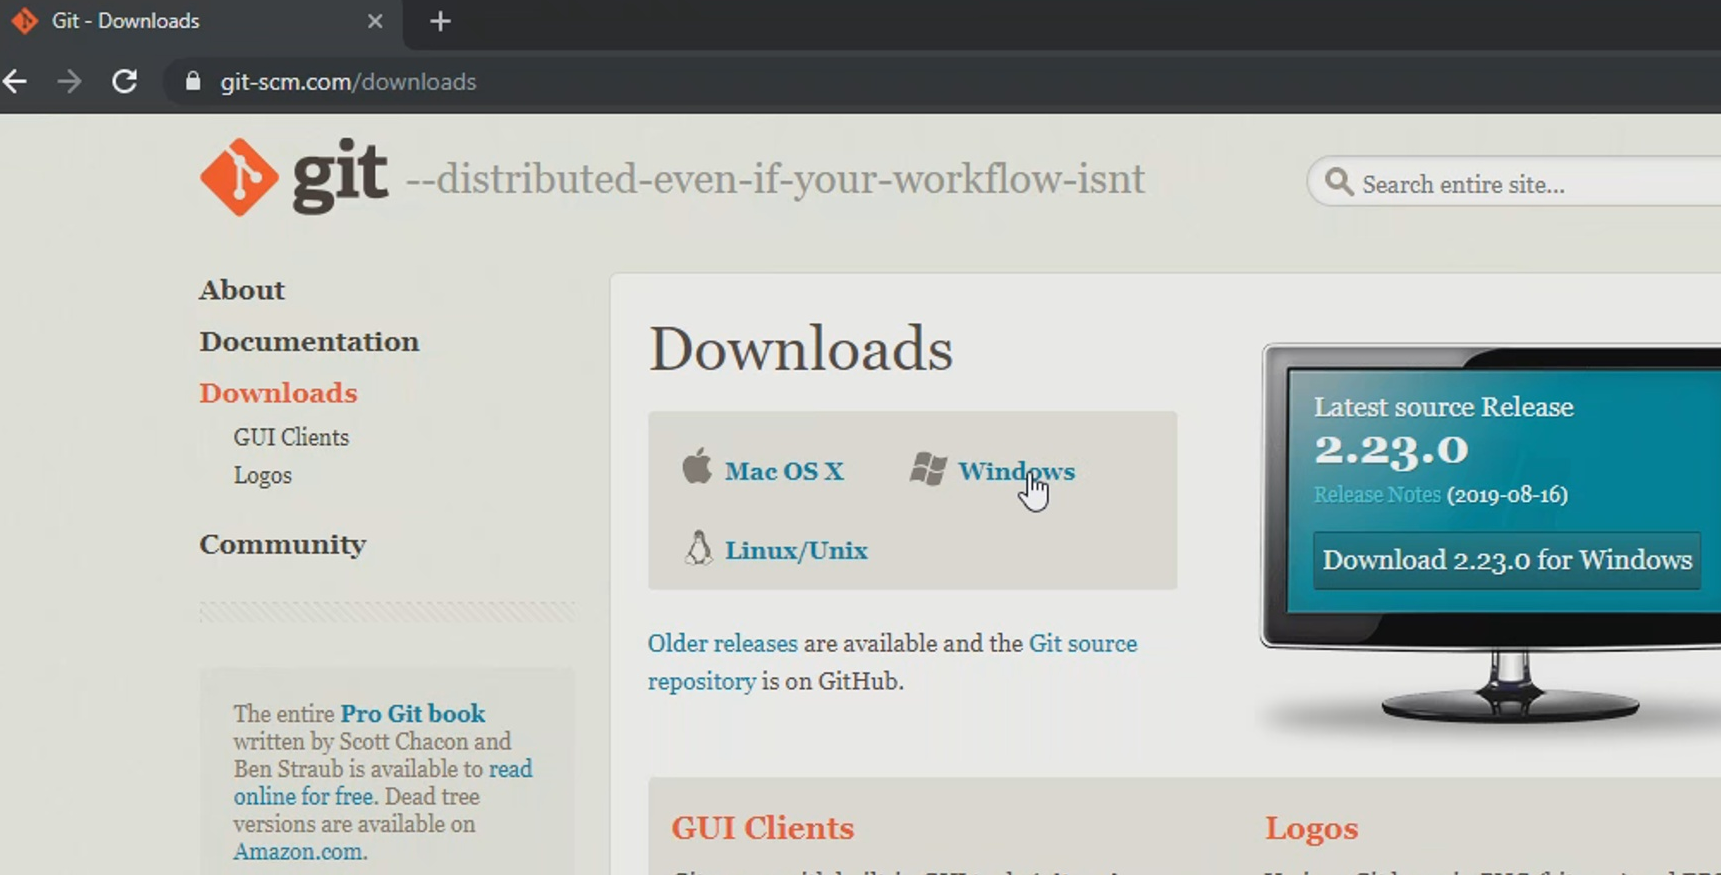
and when we do, it’ll use the User Agent of your browser to identify your platform as 32-bit or 64-bit. So make sure you do get the right one. In this case, I’m on a 64-bit system, so the 64-bit exe is the correct one for me. Of course, if you have UAC enabled, we’ll need to acknowledge the prompt with “yes” there. OK now you can review the license if you like and click “Next” when you’re ready.
Next, just confirm or change your install path:

OK next we can do some component selection:
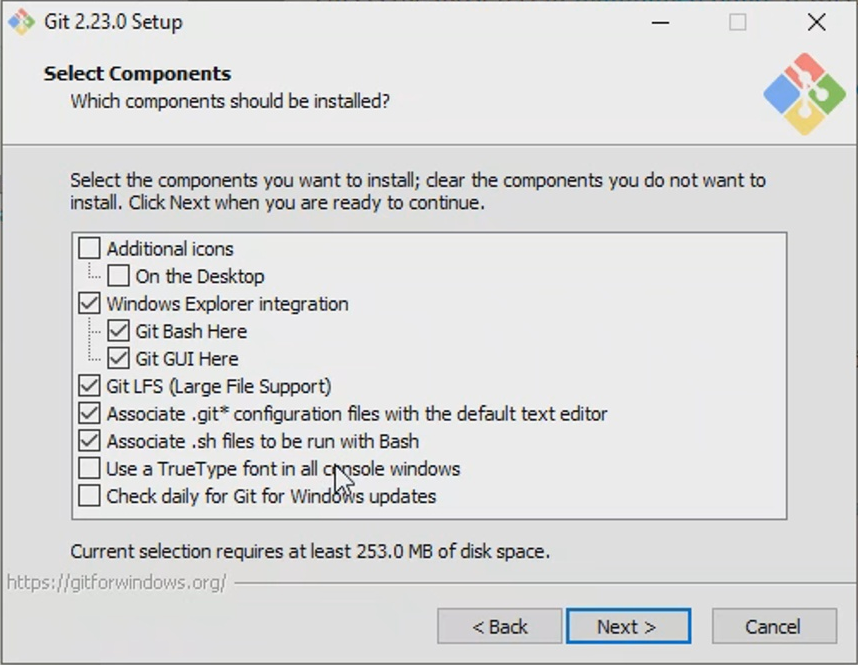
“Additional icons on the desktop” that’s just shortcuts for your desktop. “Windows Explorer” integration adds right-click or context menu items and here I’ll show you what those look like. There’s a “Git GUI” and a Git Bash item. So it sort of depends on how you like to roll, but I think most people would find these menu items helpful at least sometimes. Git LFS is a Git extension that can save you some space when dealing with large files. It does this by using lazy loading and file pointers. It works seamlessly behind the scenes, so unless you have a specific reason not to, I would enable it. Associating the Git config files with your default text editor is probably a good idea. And of course, it’s easy enough to change that later. OK “Associate .sh files to be run with Bash” – unless you want your shell scripts associated with Windows Bash or perhaps Cygwin, you probably want to check that. OK “Use a true type font in all console windows” – this can be helpful if you use Unicode characters in your file names, etc, or if you just like a better-looking font. “Check daily for updates” – I don’t recommend that because you’re just gonna get another agent running on your system using up resources.
So now we can click Next and here you can customize the Start menu folder name or not include a start menu item if you want:
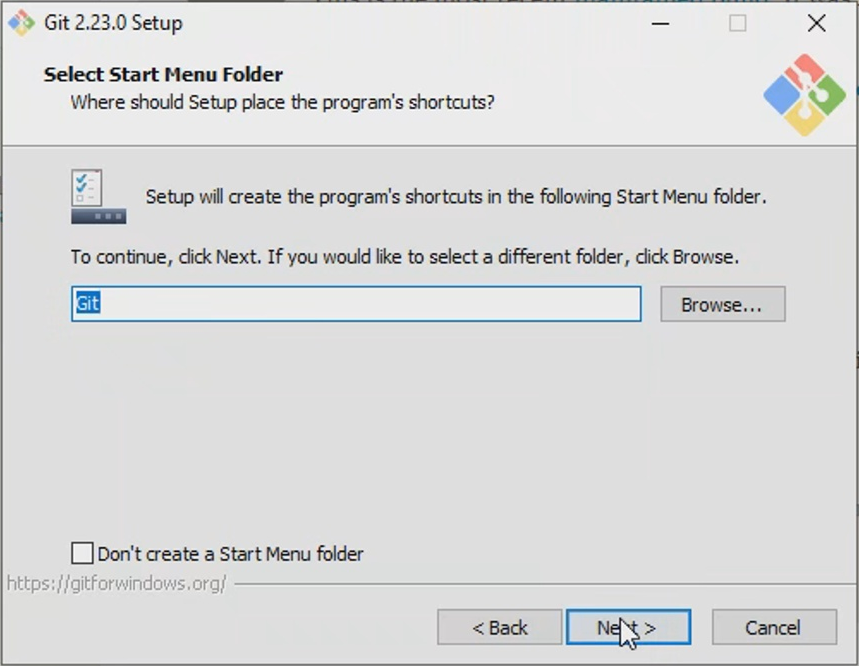
Just click Next when you’re ready. OK next we can set our default editor for Git.
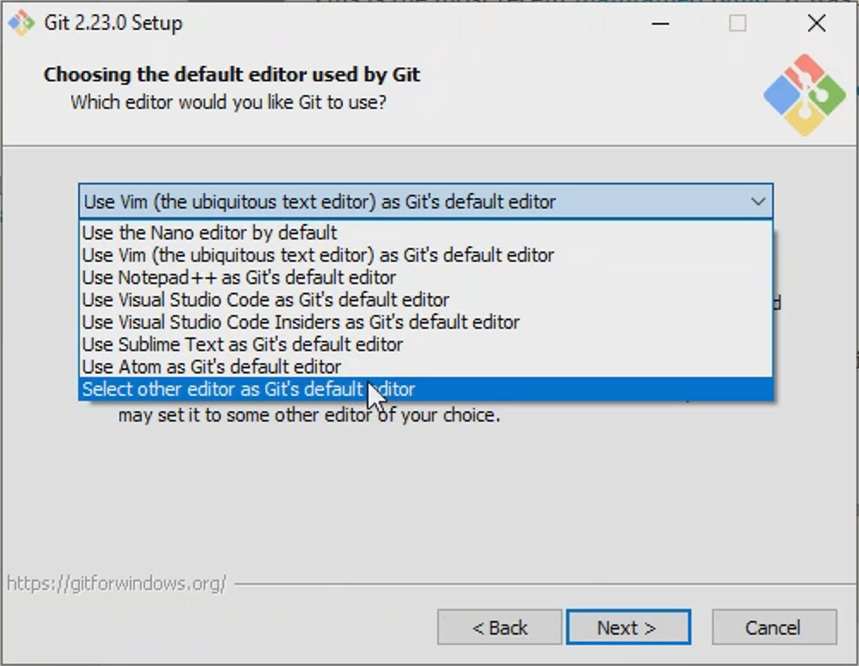
So pretty much like when you do a commit, you’ll get a pop-up text editor where you can edit your commit message; I like to leave mine at the default Vim editor. Most people don’t like that, so here you can change it to something else like Notepad++ or one of these others, or if the one you like isn’t on the list like maybe you like GVim, you could select this bottom option and change it there. If after the installation completes, you change your mind on what editor you want to use, this is how you can do so from the command line:
git config --global core.editor "'C:\Windows\gvim.bat' -f -i NONE"OK now we can click Next. OK “Adjusting your path environment”.
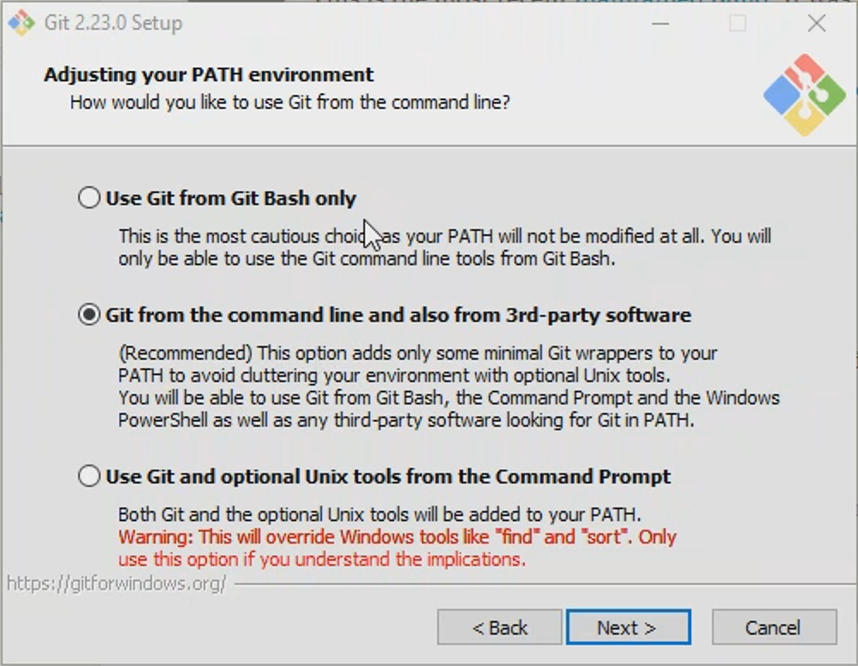
If you only want to be able to run Git and the Git command line tools from the Git Bash like Mingw, then just choose the first option. If you would like to also be able to run Git from the Windows command line you’re gonna want to choose option 2 or 3. Basically option 2 limits the Git command line tools to a subset that does not conflict with built-in Windows command-line tools. So if you have any existing Windows batch files that you run that might conflict with those, don’t choose the third option. On the other hand if you don’t have such a conflict and you like a more Linux style Windows command line prompt, choose the third option.
OK next we can choose our HTTP transport back-end.
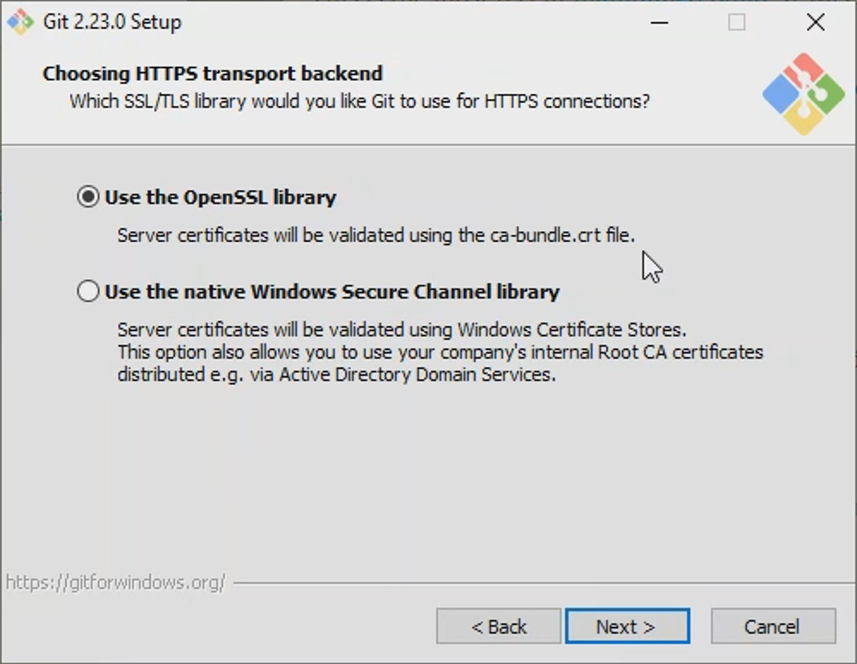
So, if you’re on a Windows Enterprise network and you need to be able to use the Windows certificate store – like you have root certs that you need to use – choose the second option, but be aware you can change them back and forth using these commands here:
git config --global http.sslBackend schannel
git config --global http.sslBackend openssl
Alright, clicking “Next”… So this is where we can set up our line ending conventions:
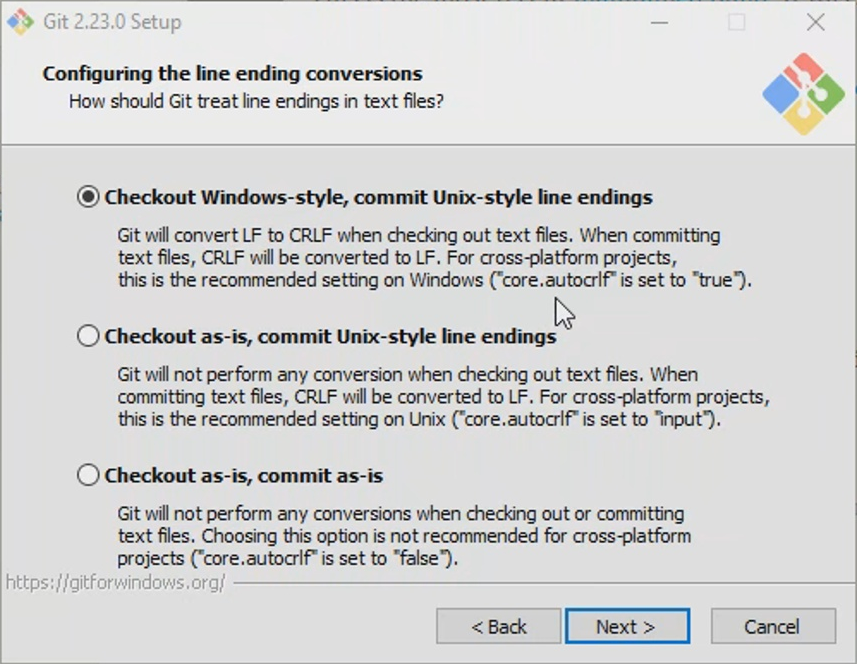
Of course, for line endings, windows likes to use carriage return line feed, while Linux / UNIX likes to use just line feed. Of course your selection here will depend largely on how you like to roll. I work a lot in Linux so I want my Git Windows to check out Windows-style, but commit Unix-style; so when I’m over in Linux I don’t have to mess with it. If you decide later on you don’t like the selection you made, these are the commands where you can change it to one of the other selections:
git config --global core.autocrlf true
git config --global core.autocrlf input
git config --global core.autocrlf false
So clicking “Next” to move on… So now “Configuring the terminal emulator to use with Git Bash”:
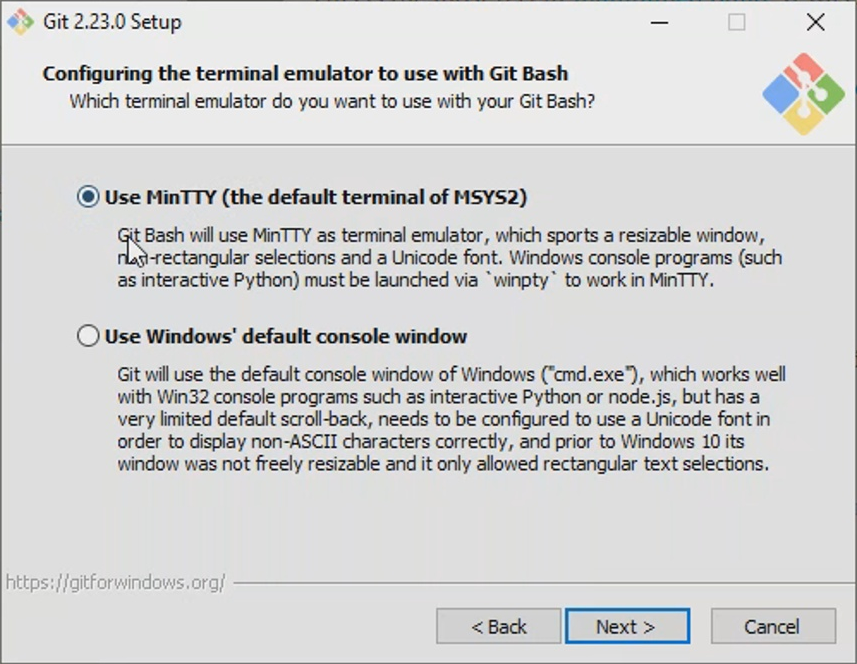
Unless you have a compelling reason to use the Windows default console, I would recommend setting this to use MinTTY. MinTTY is actually very lightweight, and more configurable than the windows console.
OK “Next”… OK “Enable filesystem caching”:
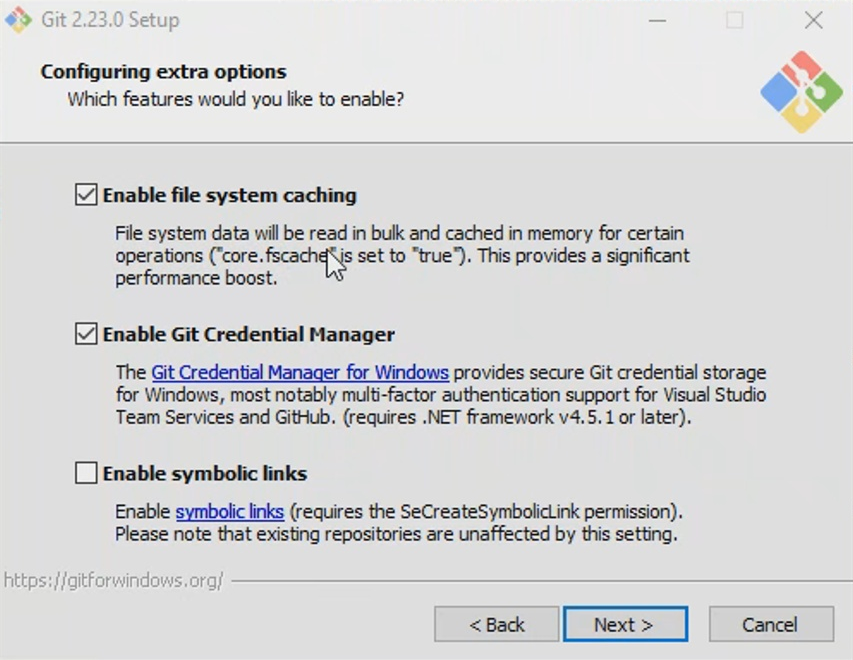
Given the differences between Windows and Linux file systems, and the fact that Git was optimized for Linux, it’s helpful to Git to bulk read and cash the lstat data for an entire folder rather than doing it onesie twosie. So that’s basically what this is; you probably want it on. If for some reason you change your mind later, here’s the Git command for changing that config:
git config core.fscache true
git config core.fscache false
OK, “Enable Git credential manager”… So, this is really the “modern way” to do this in Windows which allows for multi-factor authentication. You probably want to check it, but if you check it and decide you don’t like the popups and whatnot, here’s how you can undo it:
git config --system --unset credential.helper
git config --global credential.helper ''
git config --global core.askpass ''
OK “Enable symbolic links”, symbolic links in Windows is a little easier that it used to be. You can still have issues getting symbolic links to work right on Windows 10, but if you do, or plan to do cross-platform development you definitely want to check this box.
OK next, “Enable experimental built-in interactive add”:
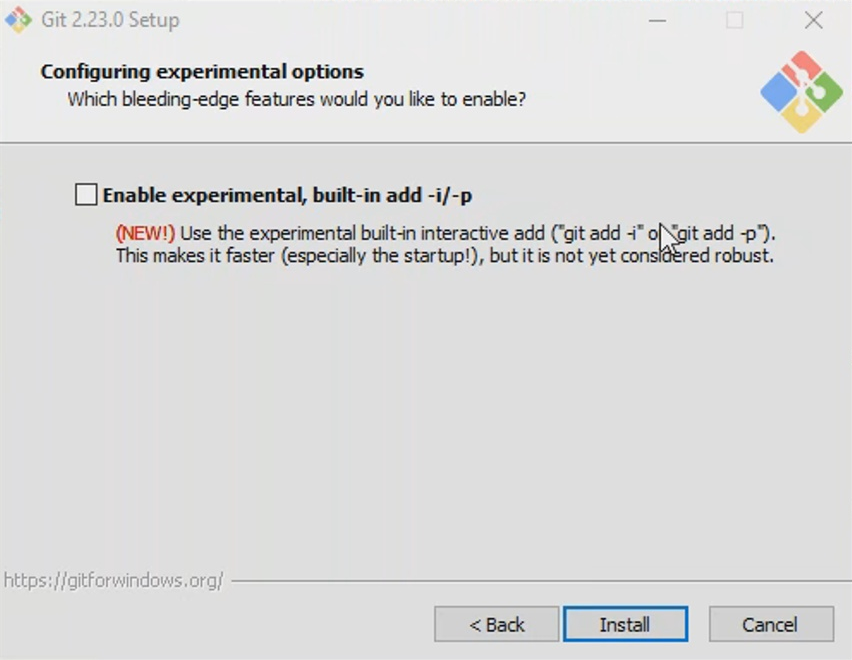
I’m not a huge fan of experimental features and I don’t use interactive add all that much but if you do, it may be worth the risk to you to get the performance boost. I believe this was introduced in Git 2.21 so it’s baked a little bit. I think there’s already been some pull requests against it but it’s not totally baked, so your call here.
OK, so finally we can click “Install” and get the installation underway. OK so now back at our command prompt… If we re-run the “git status” command, we should see it still fail because the environment variables haven’t reinitialized, which is what you get when you start a new shell. Of course opening a new command prompt opens a new shell, reads the new environment variables, which allow Windows to find Git, and here we can see “not a Git repo”.
C:\tmp>git status
fatal: not a git repository (or any of the parent directories): .git
So we know Git’s installed and working OK. But if you’re like me, you’ll prefer using the Git Bash via the MinTTY and MinGW or “Minimalist Gnu for Windows”. So I’ll take you guys out with a little basic minTTY config. In part 2 I’ll get into some of the more advanced and detailed configuration options for Git for Windows. So that’s it for this video. I hope you found it helpful. If you did, be sure to thumbs me up share me or leave me a comment. Be sure to subscribe if you’d like to be notified of my future video releases. But as far as your basic Git installation for Windows… That’s how it’s done. Thanks for watching.
Hello, and many thanks for all your good work on youTube ;
following your instructions for the batch process & minting of NFTs, I’ve also installed Git as per your detailed 2nd video but unfortunatelly, I got this error message while running the
git clone https://github.com/HashLips/hashlips_art_engine.git
& got this error mssg
The term ‘git’ is not recognized as the name of a cmdlet, function, script file, or operable program.
I’ve searched around, re-did the Path in Environment Variables but yet still having the same error.
Im not a coder person, so Im following your videos step by step and even re-installed Git thinking that I had overlooked something.
Sorry to trouble you with my candid ineptitude, I’ve tried looking around for solutions on my own before bothering you.
All the best,
Simon