
Video Description
The Postfix Mail Server (aka Mail Transfer Agent (MTA)) is installed, configured and set up to forward emails to a private email (Gmail in this case, but could be any external SMTP server) on a fresh Debian 9 system.
The Blog Variant
Installation
We’ll start by opening a terminal from an non-root account into the machine. Here I’m going to use SSH. Alright if you have an older system or it’s been a while, you may want to do this command to update your package list:
sudo apt-get updateNext you can go ahead with the command to install postfix:
sudo apt-get install postfixOK when the installation is done you should get a package configuration wizard:
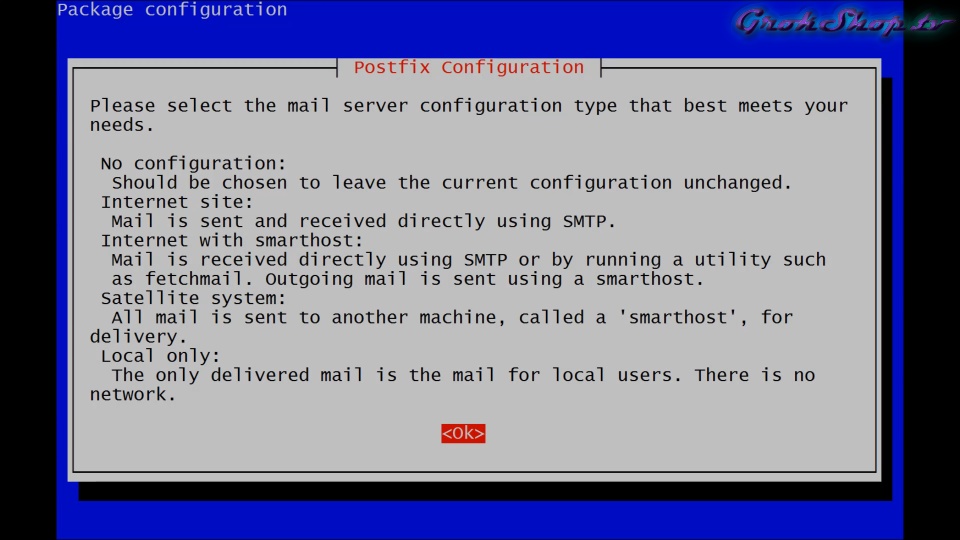
For most single server installations you can choose “internet site”:

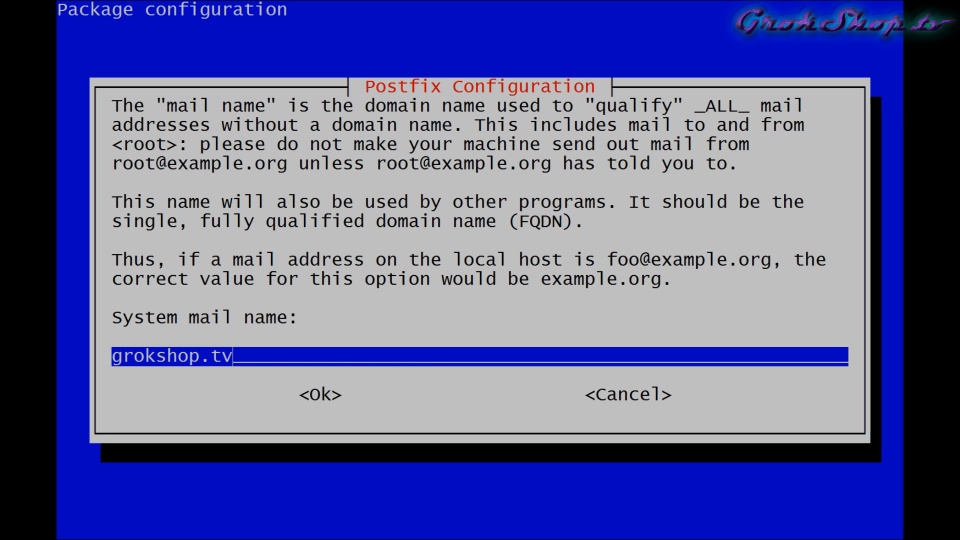
OK next we need to set the system mail name which is usually your domain so for me I’m gonna put “grokshop.tv”:
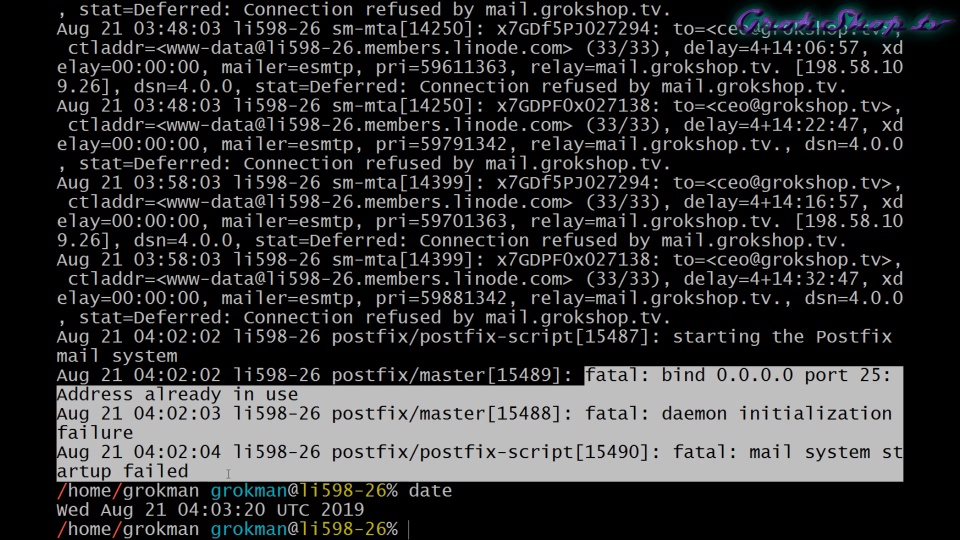
Next we can ‘OK’ out and the setup and configuration will be finalized. Once the installation is complete it should come up running but sometimes it doesn’t quite come up right. We can look at the mail log file to see what the status is:
cat /var/log/mail.logAlways a Problem!
OK in this case it looks like we do have an initialization failure:
So, the most common problem I see people have had with Postfix installations is the send mail MTA conflict. Sendmail is an old MTA but the libraries are still used by Postfix as kind of an agent. So yeah, even when there’s no separate send mill package installed you’ll still see it running as a service.
So you can see here I’m going to actually stop the sendmail, restart postfix and start sendmail to see if I can fix this issue:
sudo service sendmail stop
sudo service postfix restart
sudo service sendmail start
And in this case not so much:
sudo systemctl status sendmail.serviceSo, yeah – you definitely want to know if you have Sendmail installed already or not. If you want to install Postfix, you don’t need Sendmail. So you can get rid of it. You can use the purge command like I do here:
sudo apt-get purge sendmailand as you’ll see the purge command fails because on Debian 9, Sendmail is not installed by default. So yeah you don’t need both. Another quick way to check and see if you have Sendmail installed separately is to run the killall sendmail command:
sudo killall sendmailand in this case you can see no process is found because I don’t have it installed separately, and that’s true even though as you can see from the process list there’s still a process called sendmail. But that of course is the process that is an agent for postfix and comes along with the postfix install.
So, in this case I’m actually gonna kill the process by process ID:
ps -ef | grep sendmail
sudo kill 13364
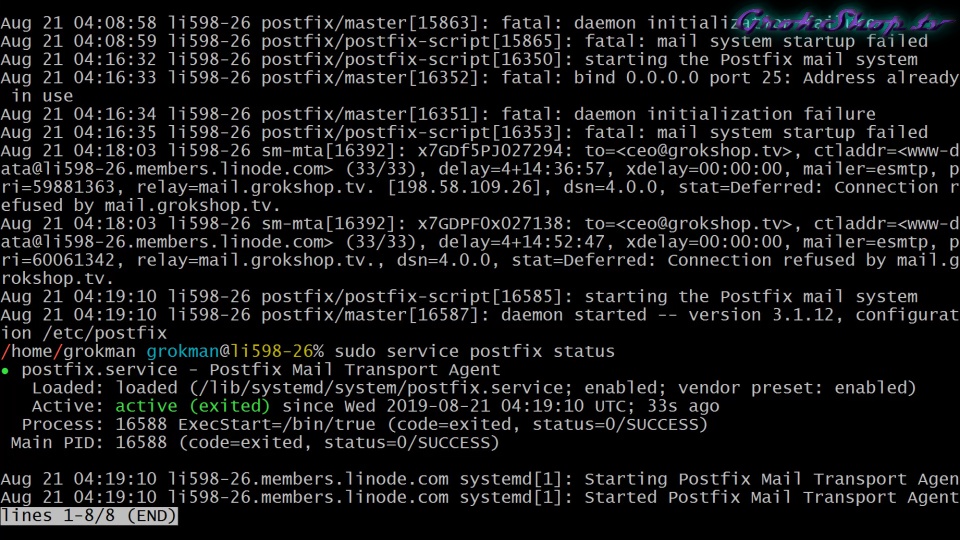
and this actually solves the problem. So it seems like there’s some sort of startup ordering problem with the way Postfix starts up the very first time. But as you can see, after I kill the sendmail process, it comes up fine:
You dig it?
OK next before we go on to configure postfix we want to make sure our MX records are set up right and to do that I’m going to use the dig command. The dig command is part of dnsutils which is not installed by default on Debian 9 so I’m going ahead and installing it here:
sudo apt-get install dnsutilsOK to check the MX records for our domain will just type:
dig grokshop.tv mxYou can add +short to the end if you don’t want the a records and all that:
dig grokshop.tv +short mxOK this is the useful bit this shows that mail.grokshop.tv handles the mail for grokshop.tv:
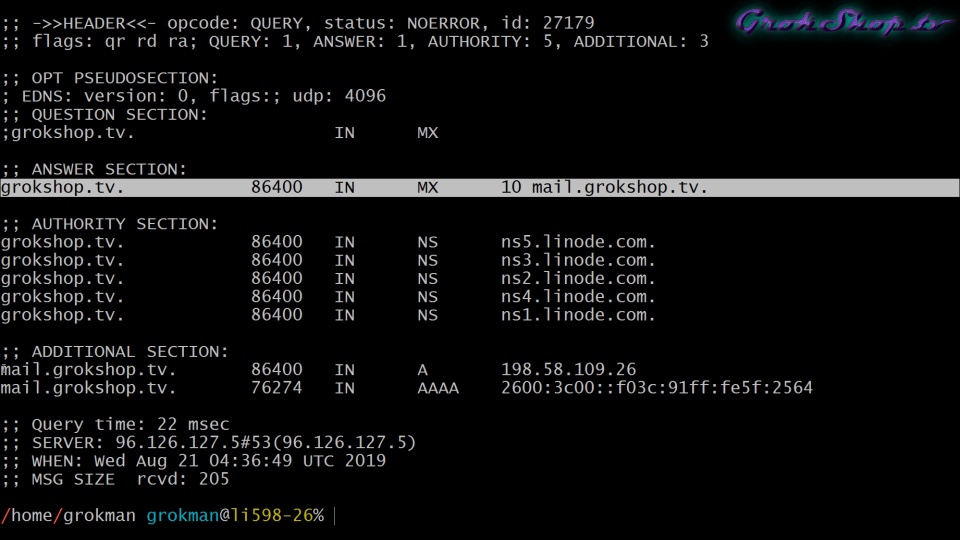
In other words, the same machine as the host handles the mail and does everything else. So in my case, its properly configured. If yours is not configured the way you want it, you’ll have to fix that in your name server configuration.
Configuring the Mail Forwarding
Alright now we’ll go ahead and set up the mail forwarding and to do that we’re gonna edit the /etc/postfix/main.cf file:
vim /etc/postfix/main.cfOK, inside this config file, we’re going to add a couple new fields. So just scroll all the way to the bottom and add these lines (substituting your domain for grokshop.tv):
virtual_alias_domains = grokshop.tv
virtual_alias_maps = hash:/etc/postfix/virtual
OK next we’ll quit out of there and then we’ll head over to edit our new file:
sudo vim /etc/postfix/virtual
OK. So, the purpose of this virtual file will be to set up a mapping between our local domain email accounts and the accounts we want to forward to (in this case, a Gmail account). So you can set up individual accounts so in case you want to have some accounts actually arrive and stay on your server (the email) as opposed to having it forwarded. Or alternatively, we can just forward everything. So here you can see to start with I’ve got two individual local email accounts set up to forward to individual Gmail accounts:
In this case I set them to the same destination email, but they could be different. With this config, you could have some email stay on your local server and some get forwarded but if you want everything to be forwarded you can just put @grokshop.tv or @[your domain] and then the address – forward:

and then in addition to that you could forward to more email addresses just by appending them to the end of the line here:

OK next we want Postfix to munge on our changes so we need to run the postmap command & feed it the file that we just created:
sudo postmap /etc/postfix/virtualWith Postfix we can run the reload command to have it reread the configuration files without actually restarting it, so we’ll take advantage of that and run the system control command and tell postfix to reload its config:
sudo systemctl reload postfixOK next we can check to see that our new parameters have been sucked into the postfix database properly by using the postconf command like so so:
sudo postconf -n |grep virtual
At this point you’re good to go; everything should be working. You can test it out by sending a mail to your domain making sure it gets forwarded to your gmail account (or whatever external mail account you are using). If you have any issues, you can take a look at the mail log.
Rut Roh… Google Isn’t Happy!
So here’s a good example of a problem you can have right off the bat:

I started getting rejection notices from Google basically they didn’t like the ipv6 set up. They said I didn’t meet the ipv6 sending guidelines because of a PTR record problem. So pretty much that’s reverse DNS. The reverse DNS wasn’t set up yet; so yeah, that would be a problem. So, one approach would be to set up the reverse DNS PTR records so that Google is happy there but in some cases you may not want to do that or you may not easily be able to do that so I decided in this case just to disable the ipv6 protocol for postfix. You can check the protocols that are enabled with the postconf inet_protocols like I show here:
sudo postconf inet_protocols
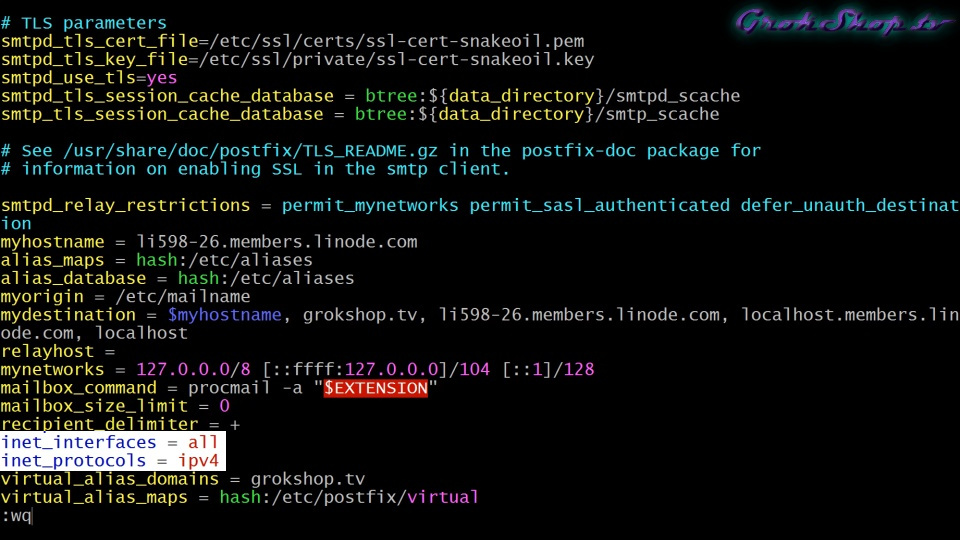
and then you can change the protocols by going to the main dot CF config file where we edited before and you go to the inet_protocols and you can change it to specify ipv4 ipv6 or all so in this case I’m just going to set it to ipv4 and then later after I fix the reverse DNS records I’ll come back and turn the ipv6 back on so I’ll have all protocols.
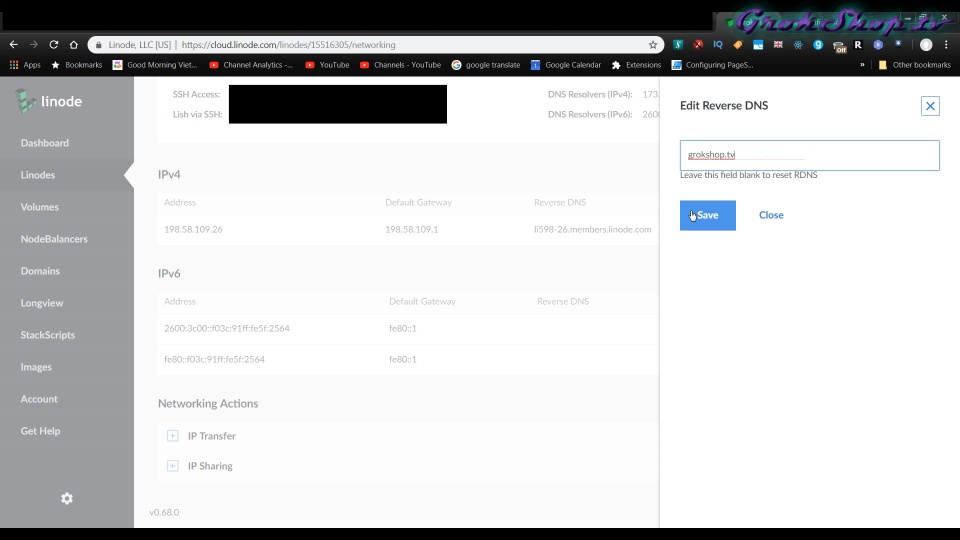
REVERSE! (DNS Config)
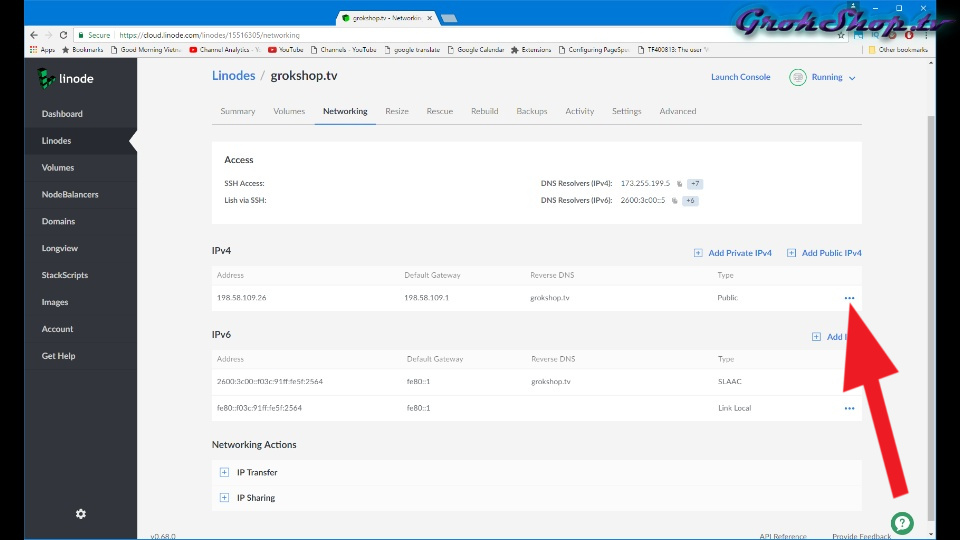
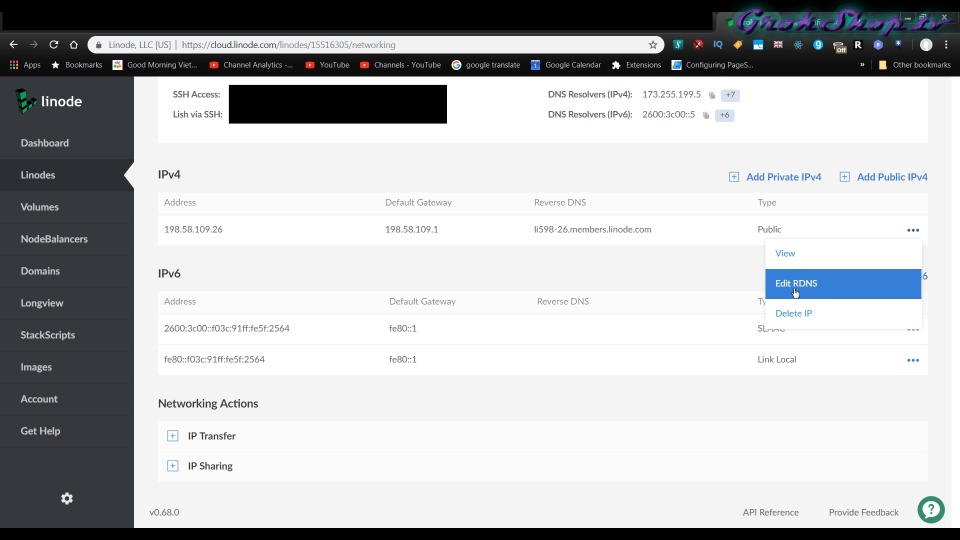
OK so let’s take a quick look on how to set that reverse DNS up. So, yeah, for me right now this particular server is hosted on Linode under Linode you set the reverse dns underneath the Linode itself not under the domain area so it’s under your Linode and then under the networking tab:
That’s pretty much all there is to it. This is how I run my own inbound mail on my server as you can see. Obviously, you could also configure Postfix to handle your outgoing mail. I know you guys are pretty smart; most of you’ll probably be able to figure that out from here but I’m not doing it that way right now because I already have an OAuth connector to do that. If I change to doing it that way in the future I’ll post up another video about that.
Future related topics that are swirling in my head: fail2ban install & config, modern email spam blocking options.
Further Reading: http://www.postfix.org/VIRTUAL_README.html
Addendum:
I recently had to add a second domain to my server. The only changes as far as Postfix is concerned, you need to add the second domain to the /etc/postfix/main.cf file like so:
virtual_alias_domains = grokshop.tv new-domain.netAnd them edit /etc/postfix/virtual like so:
@grokshop.tv [mygmail]@gmail.com
@new-domain.net [mygmail]@gmail.com
Then have postfix parse the virtual file:
sudo postmap /etc/postfix/virtualNow tell postfix to reload its config:
sudo systemctl reload postfix
Gmail is the best thing that happened since sliced bread. That may sound like an over statement. If you really think about it, Gmail definitely has changed the way how we manage emails…well what can i say than to thank you for this post.