Description
How to optimize your network for a faster internet, a faster home network & a faster Wi-Fi. A “top 10” list of actionable items you can take to improve your home networking experience
1:15 Wires are GREATER THAN Air
3:34 Balance your load
4:59 Strategic Router Placement
5:25 Scan your neighbors! & Choose Dead Air!
8:02 Use WIDE bands (where feasible)
9:12 Use custom DNS
11:41 Avoid wireless Wi-Fi range extenders / Repeaters / Meshes
12:55 Use QoS / (Pseudo-QoS) / SQM
13:59 Router Upgrade Considerations
Links
Wired networking options (sans Ethernet):
Promising “next router” choices (with any known caveats):
- Ubiquiti UAP-nanoHD (no OpenWrt support)
- Synology RT2600ac (not OpenWrt support (yet))
- ASUS RT-AC86U (limited OpenWrt support)
- Linksys WRT32X (MIMO max is 3×3)
- Netgear XR500 / XR700 (no OpenWrt support)
Mesh Router Systems:
Info Links:
TP-Link on Smart Connect:
https://www.tp-link.com/common/Promo/en/Smart-Connect/Smart-Connect.html
DNS Benchmark:
https://www.grc.com/dns/benchmark.htm
Wi-Fi Certification check: https://www.wi-fi.org/product-finder
Reasons to Use OpenWrt: https://openwrt.org/reasons_to_use_openwrt
Technical WiFi: https://www.duckware.com/tech/wifi-in-the-us.html
Transcript
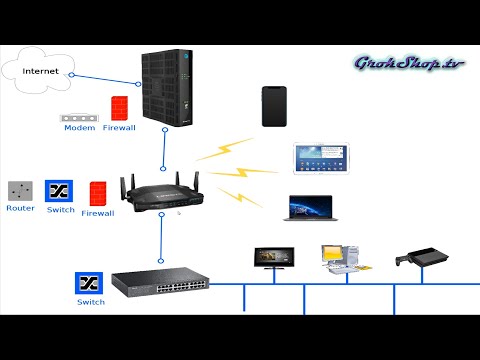
welcome to The Grok Shop, and my new series on home networking. in this video I’m going to give some tips on how to improve your home networking experience. I’ll be providing an outline of these tips and chapter markers in the description below if you want to skip ahead. for this video I only assume that you have basic knowledge of these networking components. so coming in from the internet we have our modem or some vendors call them gateways; it’s tomato tomahto really. this component can consist of firewall modem and it can also have your Wi-Fi router as well but usually a better configuration will be to have your own Wi-Fi router for reasons I’ll explain later. and of course this device can also have your firewall a switch and a router so it actually does quite a few jobs for you the typical configuration will be to have your Wi-Fi router as an access point have all your devices connected to whatever band you have configured in your Wi-Fi router since your router typically has a limited number of ports a lot of times people will add a switch 24 or 32 however many ports you need to get more wired connections and these will be devices of course that you don’t necessarily need to move around a lot which brings us to tip number one wires are greater than air what do I mean an Ethernet connection will just simply destroy a Wi-Fi connection in terms of available bandwidth and that’s because each device will have a dedicated typically these days a Gigabit link pretty soon it’ll be 10 gigabits and 100 gigabits and I repeat it’s dedicated not shared among other devices the speeds you see advertised for Wi-Fi keep in mind that’s a max combined speed for all devices sharing the link at any one time a good analogy to bandwidth is a pipe here you can see a 16 port Ethernet switch how it compares to Wi-Fi level five which is also known as AC in the old parlance or level 4 which is known as in in the old parlance and this graphics being very generous to Wi-Fi it’s basically giving idealized conditions to Wi-Fi but even so you could see the 16 port Ethernet dwarfing the AC or level 5 by about five times but that’s not even the half of it if we take away the ideal conditions of Wi-Fi and we start comparing against more real-world band widths you can see the situation gets even more stark so hopefully this will help you appreciate why wired connections can be superior to Wi-Fi in situations where it’s possible to use wired connections so hopefully you have Ethernet wiring where you live and if you do I hope you’re using it but what if you don’t well one possibility is to use MOCA which allows you to do networking over coax and the MOCA 2.0 will do up to a gigabit speed from what I’ve read MOCA is compatible with most cable providers you may have problems though if you have AT&T u-verse or satellite providers be sure to check it out for whatever provider you have some routers will even provide one end of the MOCA connection for you and you just need a single box like this in other cases you’ll need one MOCA box on each side of your coax it just depends on your configuration I’ll put some links to these below in the description if mocha can’t work for you another possibility is to use powerline adapters which allows you to do networking over your electrical lines it can be a little more problematic that’s why I don’t recommend it as a first choice but this technology is improved in recent years so it may be a viable option I’ll put links to these below as well ok so moving on the next tip would be to balance your load so by wiring up as many devices as possible you’ve already gone a long way towards this end but also you want to think about how you’re distributing your load across your Wi-Fi radios most modern routers will have two or three radios one and 2.4 gigahertz and one or two and the 5 gigahertz band a good strategy here we to put your more distant or lower bandwidth hungry devices on a 2.4 gigahertz band and use your 5 gigahertz bands for devices that are nearer to your router and have higher bandwidth needs for example your smart refrigerator or your solar panel monitor might be on the 2.4 whereas your mobile devices might be on your 5 gigahertz most devices will have a setting which lets you ignore certain SSIDs and this one way you could possibly gate certain devices and force them into certain lanes so other than manually assigning lanes for your Wi-Fi radio there is another technology out there called smart connect smart connect basically assigns the same SSID to all of your radios and then the device and the router will negotiate for the best lane for that device it’s got mixed reviews it’s relatively new technology but it might be worth checking out if you just don’t have enough of your own bandwidth to do the manual configuration ok next tip probably seems really obvious but place your router somewhere in a very centralized location avoid the use of repeaters range extenders meshes whatever you want to call them we’ll talk about those more in a minute but I think sometimes we just get tempted to put the router next to the modem in an easy location or what have you but go on the extra mile putting the router in the right place can really save you a lot of headache okay next tips four and five we’ve got a twofer here scan your neighbors and choose that err so hopefully you’re good friends with your neighbors but in fact when it comes to Wi-Fi your neighbors can be your enemies because you may be overlapping the same channels and if your channels are overlapping and interfering with each other that’s bad for your mojo so basically you want to be watching what channels your neighbors are on there’s lots of ways to do this and there’s a lot of free apps available on the app I use is called Wi-Fi analyzer and pretty much it just shows you different ways of viewing different channels that are in use my channels are the cosmic Kahuna channels so you can see I have two access points going here looks like about channel six and then I have a neighbor here showing up about like Channel nine and I’m running in 40 megahertz mode and looks like they have 40 megahertz and 20 megahertz going and this is on just one side of my house if I was on another side of my house I have a lot more activity on that side so you kind of have to find a sweet spot where you have the least amount of overlap giving the totality of interference that you have and I live in an area with big properties and I don’t have a huge amount of interference but if you’re in apartments or something like that it could get pretty crazy you can see I had the two point four gigahertz up first this is the five gigahertz view now and I have literally nobody in sight from this side of my house other side of my house would show people at least a couple of access points I think in five gigahertz but that’s not a problem for me to choose channels here but for sure most people will have more interference than this and so again the idea being just find the sweet spot and check it periodically because your neighbors will probably change channels you might get new neighbors with different routers and most people don’t even know what channel they’re on so just you’re just gonna have to experiment and find a good quiet channel as possible that you can use for those who might not know changing channels on your router super easy just point your browser to your router login go to your wireless settings page and select the proper radio in this case I’m going to do my in band radio and here you can see the channel set to channel eight a lot of times it’s just be set to auto by default so make sure you take it off auto and set your channel manually unless you’re completely satisfied with your settings already so you’re around I may look a little different from mine but follow these basic instructions they’re all pretty much the same essentially and you should be able to figure it out okay tip number six use wide bands where feasible earlier in the video I showed some Wi-Fi signals if you look at the green art versus the pink art that’s a 20 megahertz versus a 40 megahertz Wi-Fi signal pretty much the bitrate that you can get is proportional to the bandwidth so the area under the curve of the pink is going to be roughly double the area under the curve of the green so that shows you how you can get a higher bitrate from a higher bandwidth so the caveat to using wide bands is that white bands are going to be more prone to interference and I would only recommend running wider bands in situations where you have a relatively quiet piece of the spectrum that you can occupy so back in our router settings you’ll find the bandwidth setting near the mode in channel settings pretty much the in band will have 20 or 40 megahertz band whatz and then if you change to AC mode or if you’re already in AC mode you’ll see a different range of widths so you might have to do a little bit of experimentation to see what fits well to minimize the interference and get you that highest possible bitrate okay tip 7 use a custom DNS server by default most people will be using their ISPs DNS and usually that’s not the best selection and I’ll give an example of that here in a minute but first a quick overview of what DNS does so basically when you go to a new URL like in this example we have www pedia org your computer doesn’t go to URLs it only goes to IP addresses so it has to figure out what is the IP address for that URL and the DNS system is the lookup system for that so without going into too many details suffice to say it can be very complicated and slow and any way you can speed up this process is only going to be to your advantage there’s a couple different ways you can speed up this process the easiest simplest way is to simply change your DNS server and you can change it per computer or you can change it in your router so that computers that use DHCP which get their DNS server from the router will all get the same faster DNS server another way to do it is to shortcut the DNS process by using a local DNS server on the router this is a little more of an advanced configuration topic and I’ll get into this more in a later video to implement the first option you simply need to find out what’s a better DNS server for you I like to use this tool DNS benchmark by Steve Gibson it’s a really tight tool and I’ll put a link to it in the description below but you can see here how it looks in action finding the fastest DNS servers that just bubble up to the top there’s a few nuances to getting the best possible results from this tool I won’t get into all that here but you guys can look all that up if you want but it’s pretty simple to use once we know which DNS IPs you want to use we go back to our router config and usually where you configure your static IP dress and general router configuration you’ll have an area to enter custom DNS servers and just pop them in right there and off you go since you can also configure your DNS locally it can be kind of confusing knowing exactly what DNS server you’re actually using there are several different ways to test this out in one easy way though is to go to DNS leak test com hit the test button in order to come back and tell you what DNS server you used to run that test and the inside of that web page when you hit the test button they have a random URL which points to their DNS server and you’ll hit that so they’ll know what DNS server you use when you run the test ok next it’s a good idea to avoid wireless Wi-Fi repeaters range extenders and meshes and when I say wireless I’m referring to the link back to the router now sometimes when coverage gets spotty what people will do is they’ll buy a wireless repeater that you just plug into the wall and it’ll run on the same channel as your main router but these types of repeaters can be problematic if the repeaters using an Ethernet connection or mocha or powerline adapters to get back to the router then it’s no big deal but if it’s using a wireless backhaul it’s basically using bandwidth that would otherwise be available for your devices so I say avoid because it’s not necessarily a terrible thing if you’ve placed your router in a good central location and you just don’t have the Ethernet lines do proper backhauls then go ahead and do a mesh system that has multiple radios because that’s sort of the best thing going right now in terms of these repeaters and I think in the future it’s going to continue to get better but you need at least two radios to have a streamlined system that doesn’t self interfere to where the performance degrades terribly I’ll put some links to these types of mesh systems in the description below okay if your router supports it you want to use that QoS or sq.m which stands for quality of service and smart queue management what these technologies allow you to do is to prioritize your network traffic so for example if your kids are playing roblox and watching 4k movies and you’re trying to get some work done that can be a problem if you can’t get enough bandwidth because of all the other traffic on your network so these technologies will allow you to address those issues in some cases you can prioritize based on individual machines some cases you can prioritize based on ports and in other cases you can just do ana Galloway an or fair treatment for all on your network again every router is different I’m running open wrt on my router and I’m using the sqm package there’s a different package – called QoS so yeah research your router see if it supports QoS or sqm it’ll definitely help reduce congestion on your network and as a side benefit it will help reduce buffer bloat which is a kind of latency you can get when you have a lot of congestion on your network ok so hopefully you’ve been able to get your old router to work the way you want but let’s face it sometimes you get to the end of the rope and you find out your router is just crap if you go to upgrade your router here’s some things to think about number one look for routers that are Wi-Fi certified because it should help with interoperability and security and as well reliability I’ll link the Wi-Fi or product finder which will help you find Wi-Fi certified routers ok next be sure to look for devices that are 4 by 4 MIMO or multiple-input multiple-output as a minimum I think it goes all the way up to 8×8 a lot of routers today are only 2 by 2 or 3 by 3 and basically MIMO is a kind of a multipath technology which allows you to multiply how much capacity you get for your available bandwidth without adding actual bandwidth so it’s a pretty cool technology and as time goes on more and more devices will support higher levels of MIMO some devices may only support 2 by 2 and that’s going to be your cat because it’s got to be on both sides but definitely try to make 4 by 4 your minimum there ok try to find a router that supports DFS our dynamic frequency selection what this is is basically routers have an opportunity to use bandwidth that is normally reserved for radar and certain routers have the logic program to detect if those radars are in use in your areas and if they’re not you’ll have more channels come available in the five gigahertz setting at 80 megahertz width and you’ll get basically four additional channels come available if your router supports DFS so try to make that a priority if possible another piece of technology to look for would be the 802 11 AC beamforming sometimes called wave 2 basically this means if the router has multiple antennas it can actually put more transmit power in to give an antenna and put a larger lobe in a certain direction and increase the bitrate by a certain amount ok next if you’re an advanced user and you’d like to have a lot of ability to fine tune things on your router definitely consider open wrt basically it’s an open source software that you can retrofit onto a new router or an old router and it’s got some pretty nice features you don’t necessarily have to be super advanced you don’t have to use all the features I’m using it and I’m not really a propellerhead but most guys who are they do stuff via the command line but it has a nice GUI that you can use so consider that and some routers are built already to be able to run open wrt I will be getting into some videos on open wrt in this series on down the road but for now I’ll put some links in the description below to help you guys find more information on it last point on the new routers Wi-Fi 6 is coming it’s probably going to be out in 2020 sometime as of this video right now it’s still in draft form so I wouldn’t buy into the hype about Wi-Fi 6 support because if you get one now for Wi-Fi 6 things could change and you might have problems with it down the road so I would make it a priority quite yet if you’re watching this video in 2020 and it’s already come to fruition definitely get Wi-Fi six compatibility in your next router one last note guys on making changes in general engineering troubleshooting I’ve given you a lot of points here and when you go to troubleshoot your system and make a change I would recommend make one change at a time only turn one knob at a time note the effect and put it back and then move on to the next and make that change note the effect and put it back and then when you’ve gone through everything you can see what had the greatest effect and was it positive or negative and you might want to let it cook for a day or two for each change to make sure it didn’t have any negative effect for example sometimes it can take a while for things to surface and then of course ultimately you go back and apply all the changes which had a positive effect so in this way you know you learn a lot you learn more about what effect each thing has and when you move on to your next router later that information can help you out yes it takes more time to do it that way but doesn’t everything that’s worthwhile so that’s all for today be sure to stay tuned for more videos in this series on a home networking and Wi-Fi routers but as far as general tune ups go and your home network that’s how it’s done thanks for watching
I got know your article’s Content and your article skill both are always good. Thanks for sharing this article this content is very significant for me I really appreciate you.